
Why take your restaurant online with WooCommerce?
If you own a restaurant or café these days, it’s almost a given that you need to offer online ordering to compete. In fact, the online food order market has more than doubled during the COVID-19 pandemic, compared to the previous annual growth rate of 8 percent.
You may have recently looked into taking your restaurant online and found plenty of third-party solutions that give customers the ability to create orders and arrange for pickup or delivery. You might be surprised to learn that all of that is possible by creating a WooCommerce restaurant. It’s not difficult to set up using WordPress.
First, let’s talk about how WooCommerce compares to using one of those third-party apps.
Comparing WooCommerce with third-party apps
While the most popular online ordering apps can offer good solutions for marketing, you typically pay a high percentage of fees for each order that goes out your door. In addition, the information they take from each order is used to generate repeat orders – which would be great, except that they’re also showing offers from competing restaurants. It’s almost impossible to create a direct relationship with individual customers.
In comparison, WooCommerce gives you full control over your site, and most importantly, your customer relationships. There are also zero commission fees involved, so you keep the profits from your orders. You set up your preferred payment methods and manage everything through your WordPress site. There are no third parties handling the order transactions.
While WooCommerce is a fantastic option, it can’t do it all alone. The good news is, you can use one plugin to take care of the rest. It’s called Orderable.
In this article, I’ll show you how to set up an online restaurant that’s just as robust as one of those third-party apps – while you maintain total control.
The Orderable plugin helps create your online restaurant
Setting up your WooCommerce restaurant website with a full menu and the ability to accept orders can be a complicated process. It can also be an expensive prospect. You need to hire a developer, find a third-party app to handle your orders, and integrate it seamlessly into your site.
There’s an easier way.

Orderable is an all-in-one plugin that’s designed to work with WooCommerce. It handles pretty much everything for your online restaurant. It will even install WooCommerce for you, if necessary. Once you have it installed, you only need to add your menu items, process orders, and deliver them. It’s surprisingly easy because Orderable does the heavy lifting for you.
If you’re a restaurant owner who likes to DIY your website, you’ll be able to set everything up without writing any code. If you’re a developer, you’ll now have a new service offering for your restaurant clients – and you can stay right inside WordPress for all of it.
Another advantage of using Orderable is that there are no additional fees or commissions to be paid when you use it. You’ll keep more money in your pocket – and with the slim margins in the restaurant business, that will be a huge relief.
Let’s get into how to set up and use the plugin to create your online restaurant.
How to set up your WooCommerce restaurant
If you already have WooCommerce installed, that’s great. If not, the Orderable plugin will help you handle that during setup.
Step 1: Install Orderable
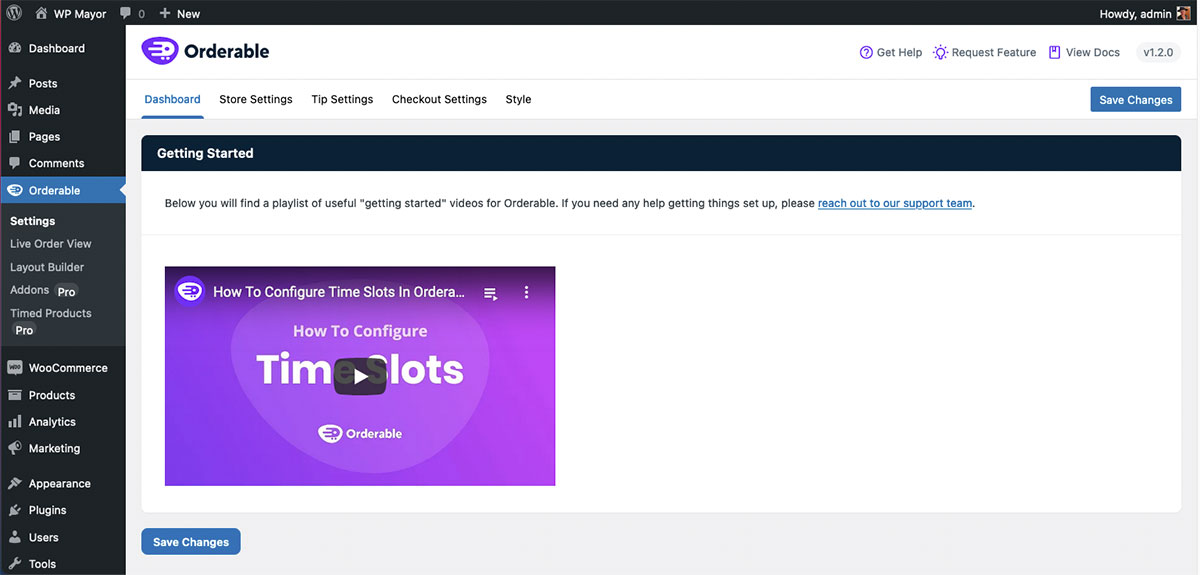
First, you can install the plugin from your WordPress dashboard. From your WordPress dashboard, go to Plugins > Add New. Search ‘Orderable‘ in the Search plugins search bar at the top of the page. Orderable should appear as the first result. Click the Install button. Then click the Activate button.
Once you activate, you’ll be taken to the menu page. You’ll see there’s a handy playlist of videos to walk you through different features.
You can find more detail in their extensive documentation.
Step 2: Configure your restaurant
The first thing you’ll probably want to do is to set the store hours for your WooCommerce restaurant, which may or may not match your regular store hours. Just navigate in the top menu to Store Settings. It’s very intuitive to set your hours, which are entirely under your control. It’s also important to note that in WordPress you’ll need to make sure your timezone is set correctly.

There are also choices to be made for delivery/pickup, lead time, and holiday hours. The other menu items for Checkout settings, Tip settings, and Layout are equally intuitive and will depend on your personal preferences.
Step 3: Add food items
For this, you’ll be adding food items to the WooCommerce dashboard. Even if you’re familiar with WooCommerce, there are still some areas you’ll want to pay particular attention to.
- From the WordPress dashboard, go to Products > Add New.
- The next page will look similar to a blog post. This is where you’ll add your product info.
- Give it a title and a description if you like.
- Scroll down to the Product data section and enter a price.
- In the Product Image section on the right, click Set Product Image to add a photo.
- You can also create product categories that make sense for your WooCommerce restaurant.
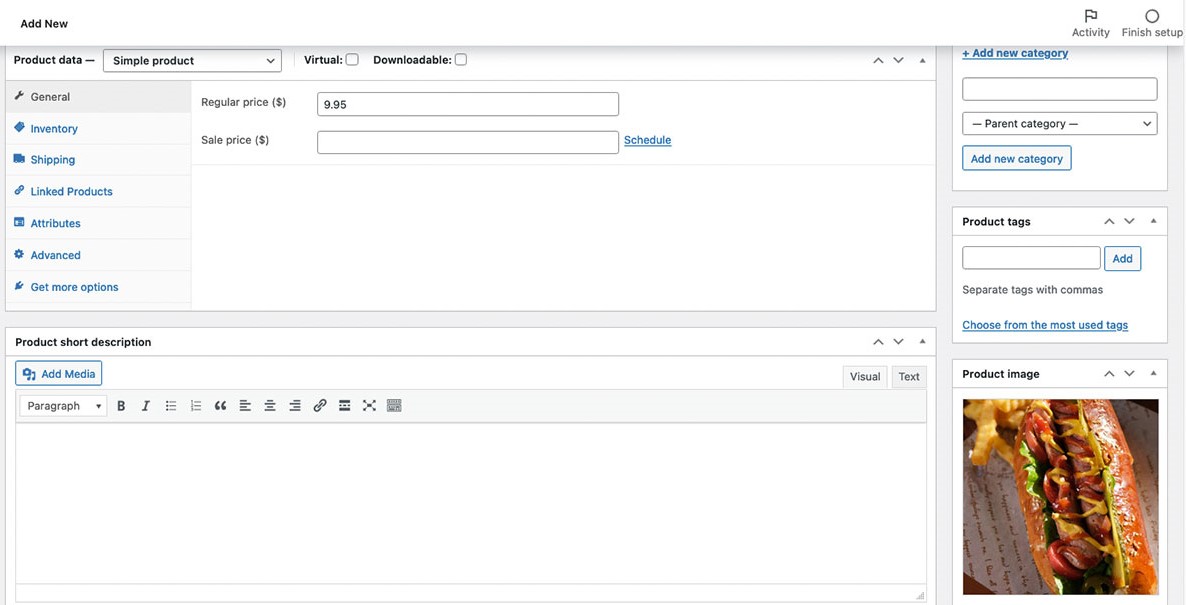
When you’re ready, click Publish at the top of the page.
Step 4: Add Product Addons
You may want to provide the ability for customers to add items onto their order, like extra onions or mustard. You’ll do this in the Orderable menu, under Orderable>Product Addons. From that menu, simply click Add New to create an addon. You’ll be taken to a menu where you can fill in the details:
- Click the Add Field button.
- Click the field. You’ll be shown a page where you can enter details.

You also have the option of creating rules for the addons. For example, if you only wanted to offer the ability of adding ketchup to sandwiches and not milkshakes, you could set that up here.
Creating different menu layouts is super easy. Navigate to Orderable > Layout Builder. As you did with the Product Addons, click Add New.
Again, the selections are fairly intuitive and will depend on your preferences and needs. There are selections to display products by category, display by grid or list, and display images. One helpful feature is to choose whether the whole menu card is clickable or just the Select button.
There is also a layout preview at the bottom of the page that gives you an idea of how the grid or list will look on the page.
At some point, you’ll want to display the menus you’ve created on your site. Orderable has a specific block you can use to add a menu to any page or post. It’s easy to do:
- On the page or post, add a new block.
- Select Orderable: Product Layout.
- In the right-side menu, choose the layout you want to add.

Helpful tip: Depending on your theme and settings, you can adjust the product layout’s width by converting it to a Group. That gives you a little more control over how the grid or list displays on the page or post.
Additionally, you can use shortcodes to add your product layouts to your pages. Go back to Orderable < Product Layout. In the list of layouts, you’ll see Shortcodes and PHP Functions next to each layout you’ve created. Simply copy the shortcode you want, and go back to edit your page.
Add a new block, choose Shortcodes, and enter the code. You won’t see the menu displayed in Edit mode, you’ll need to preview the page. Again, if you convert the block to a group, you can adjust the width on the page.
Timed Products
One feature that can be helpful in generating sales is Timed Products. Under Orderable >Timed Products, you can create any products you want, similar to Product Addons and Layouts. You can set up the rules for how the product is displayed and when.
For example, you could offer a regular special that’s only available to order every Tuesday during lunch hours. Or, you could create a BOGO for a specific product and make sure it’s only available on the weekend.
That’s it, your restaurant is set up! You can now go and add new products, layouts and add-ons whenever you need them. There are also helpful tutorials on the Orderable site to help you set up and configure your online restaurant.
A complete online ordering solution for your restaurant
You can see that creating a WooCommerce restaurant is not only doable, it’s actually pretty easy. In a relatively short amount of time, you can be ready to start taking orders and compete with restaurants that offer takeout and delivery online. It’s also mobile responsive, so you can take advantage of the fact that the majority of online food orders are made from smartphones.
At $149 per site, the pricing is affordable, especially considering that Orderable doesn’t take any fees on your orders. The money you save from zero commission fees – compared to pricey third-party apps – more than pays for the price of the plugin.
We also have an exclusive Orderable discount that can make the price more attractive. Click on the link below to get an extra 15% off your order!
It’s also easy to train your staff on how to keep the menus and system updated, so you can change up your offerings at a moment’s notice – no waiting for a developer to update your site for you.
Because it’s WordPress, your online restaurant is completely customizable. And, because it’s integrated with WooCommerce, you can easily sell merch on the same site. What other possibilities can you see by using Orderable?
0 comments:
Post a Comment