
Need to accept payments on your WordPress site?
Whether you’re a business selling products, a freelancer charging for services, a non-profit soliciting donations, or anyone else who needs to receive money, you want to make it as easy as possible for people to pay you.
That means you don’t just want to add any old payment form, but you want to create a user-friendly, frictionless payment experience for your visitors.
With the Payment Page plugin, you can create flexible, stylish payment pages and forms using Elementor’s visual, drag-and-drop interface.
You can fully customize your payment options and form fields and then control the style from Elementor – all without ever looking at a single line of code.
In our hands-on Payment Page review, we’ll take a look at this freemium WordPress payment plugin and show you how it works.
Payment Page Review: What the Plugin Does
At a high level, Payment Page is a solution to accept online payments on your WordPress site. Obviously, there’s a lot more to it than that. But the high-level idea is simple – you can easily start accepting payments via your WordPress site.
So how does it help you do that?
First off, the Payment Page integrates into Elementor so that you’re able to create and customize your payment forms using Elementor’s interface. You’re not only able to customize payment options and form fields, but you can also fully customize the style and design of your payment forms using Elementor’s controls.
This is great for building stylish forms because it gives you full design control without needing to use custom CSS. You also get 11 different full payment page templates that are powered by Elementor for easy visual customization.
You can check out all of the templates here – click on a specific template to see the full design and an example of the payment form.

Currently, Payment Page supports both Stripe and PayPal for payment processors, with plans to add other gateways such as Authorize.net .net and more. Within those two “parent” gateways, you can access lots of other payment options, including the following:
- Apple Pay
- Google Pay
- Plaid
- AliPay
- Microsoft Pay
- Etc.
You also get payment flexibility to collect the following:
- One-time payments
- Automatic recurring subscription payments on any schedule
You can also mix-and-match the two and include unlimited payment options within a single form.
Here are some of the other notable features:
- Multi-currency support – accepts payments in different currencies, including giving people the option to filter currencies on the payment form.
- After-submit actions – you can send confirmation emails, show custom messages, and/or redirect users to another page.
- Responsive design – you can use Elementor’s responsive controls to adjust how your form looks for different devices.
How to Use Payment Page to Accept Payments
Now that you know what Payment Page does, let’s take a look at what it’s like to use Payment Page to set up a stylish payment page and start accepting payments.
I’m using the premium version on my site for these examples, but the general process will be the same even with the free version.
1. Connect Your Payment Gateway(s)
When you first activate the Payment Page plugin, it will launch a setup wizard to help you configure your “main” parent gateway.
At the time of our Payment Page review, those options are Stripe or PayPal:
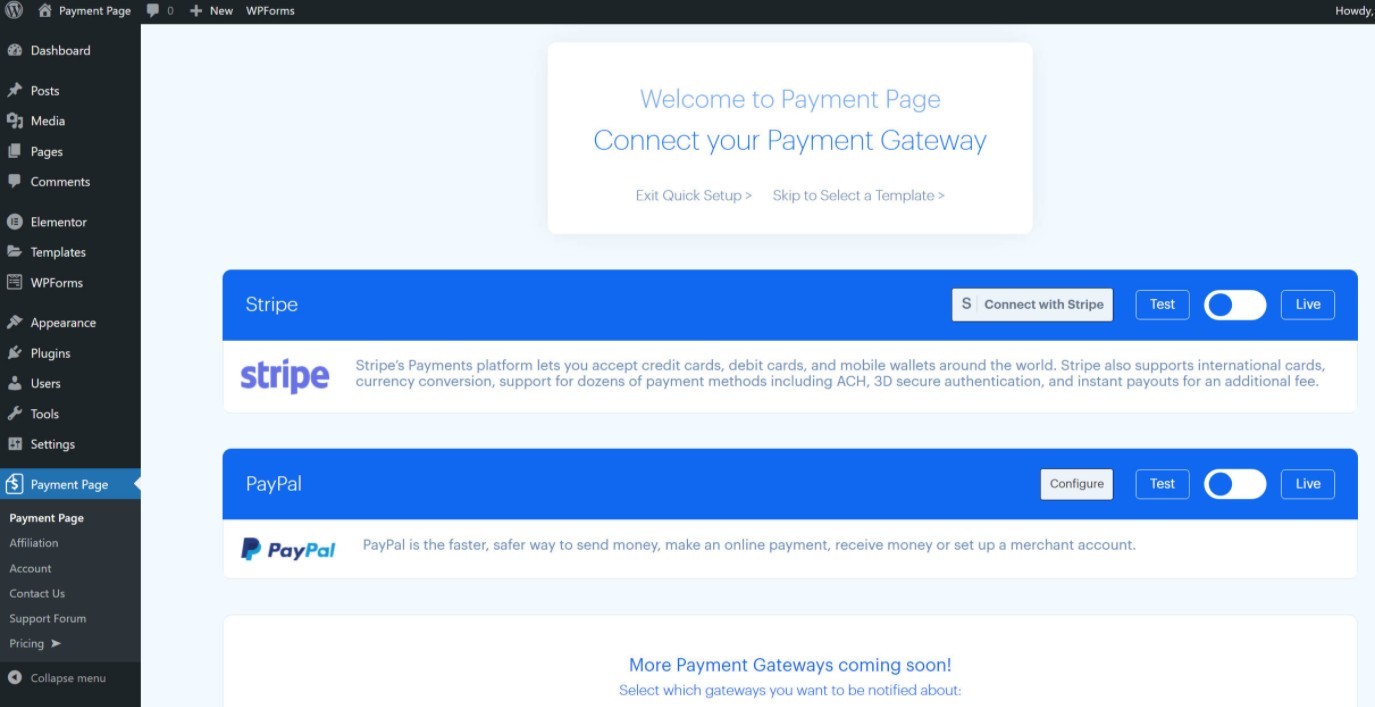
For each gateway, you can use it in both “live” and “test” modes. In live mode, your site will actually process real payments, while test mode lets you play around with things using dummy data.
If you want to use Stripe, Payment Page supports the simple Stripe connect interface, which lets you set everything up without needing to mess around with API keys and such.
Or, if you’re just testing, you can just click a button to continue in test mode without needing to do any more advanced setup yet:
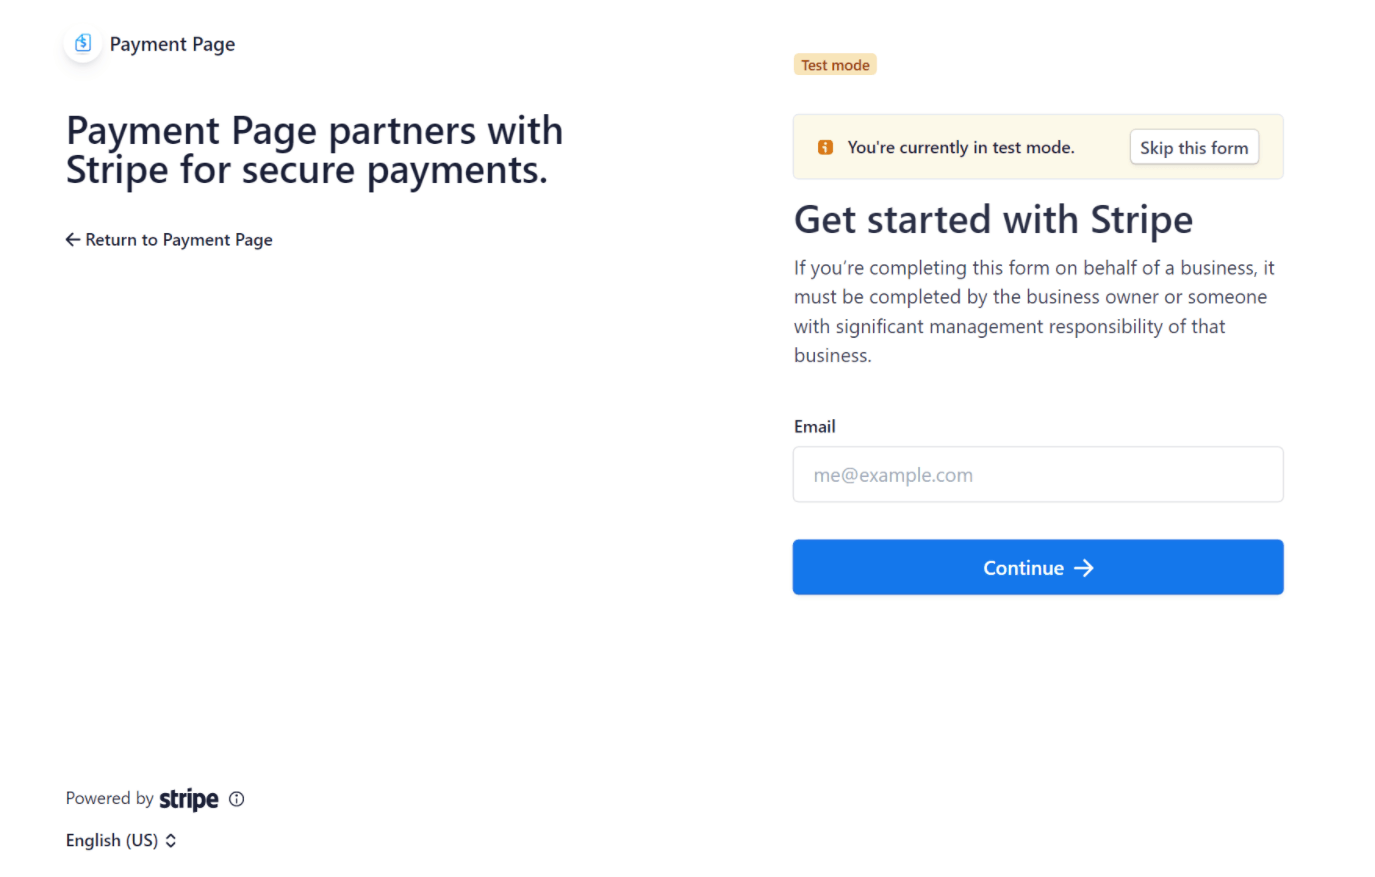
Once you set it up, you’ll see an indicator in your WordPress dashboard telling you that you’re connected.
For PayPal, you’ll need to enter your API keys, which is a little more complex but still not too bad (and this isn’t Payment Page’s fault – blame PayPal for not offering a slick connection setup like Stripe):

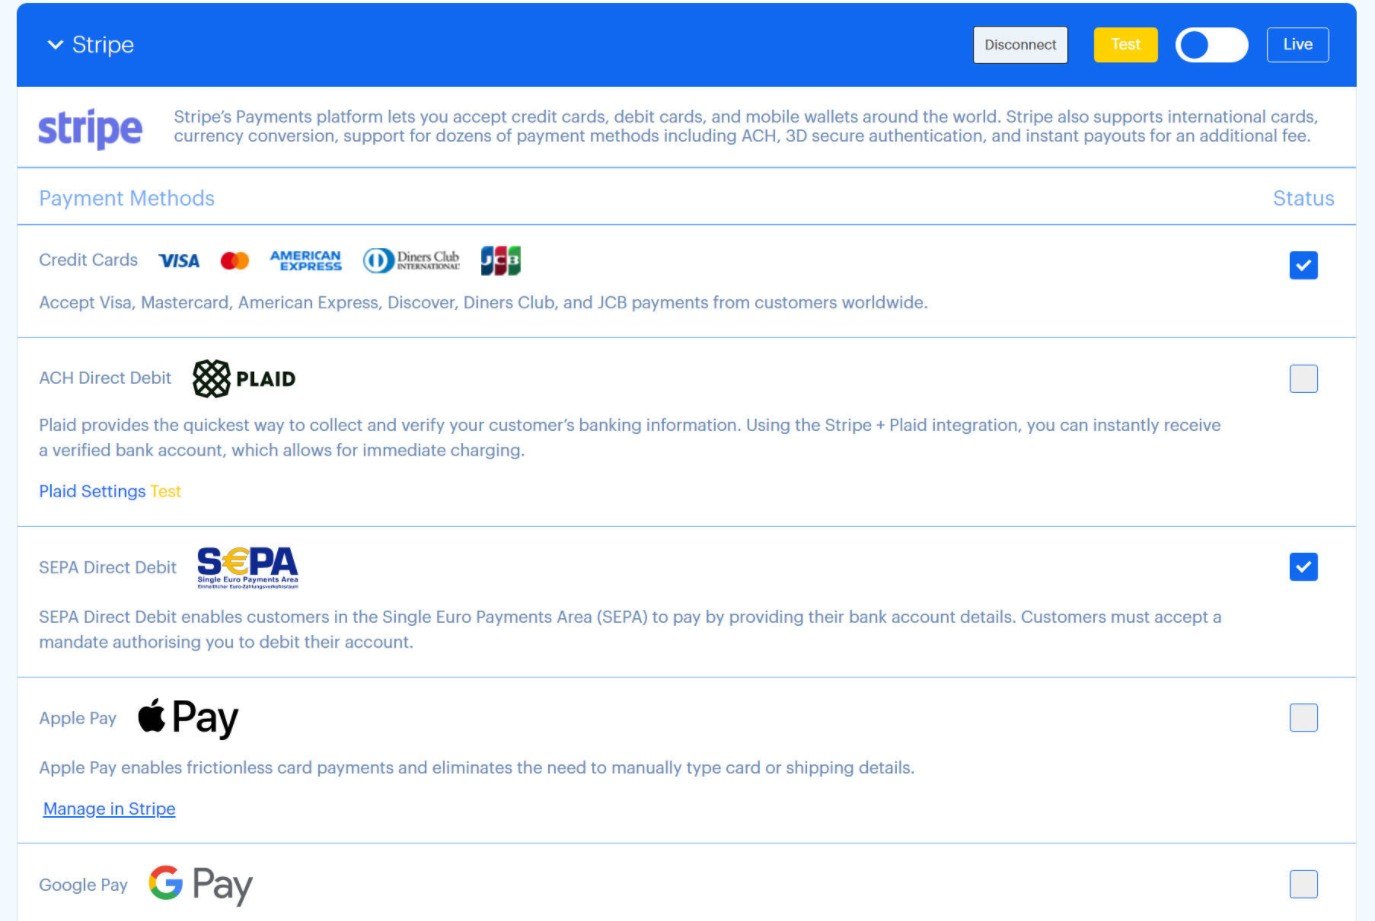
2. Configure Payment Gateway
Once you’ve connected your preferred payment gateway(s), you’ll get some additional options based on that gateway.
For Stripe, you can easily enable additional gateways like Apple Pay and Google Pay just by clicking a toggle:
3. Select Your Template
Next, you can choose the template for your payment page. You can also use Elementor to design your payment page from scratch if preferred.
Again, one of the unique things about Payment Page is that it goes beyond just offering a payment form and offers complete payment page designs for different use cases such as businesses, freelancers, non-profits, and so on.
Payment Page currently offers three different templates with the free version and 11+ templates with the paid version. You can import a template just by clicking a button:

Once you import your template, you can edit it just like any other page you’ve designed with Elementor. This is also where you’ll customize your payment form. Speaking of…
4. Customize Your Payment Form Functionality
To customize your payment form, you’ll use the dedicated Elementor widget. This is convenient because it lets you customize your form while you’re customizing the design of the rest of your payment page.
To get started, launch the Elementor editor. If you imported a Payment Page template, you’ll edit that template page. If you don’t want to use a template page, you can just create a new page with Elementor.
Then, edit the Payment Page – Form widget (or add the widget to the page if you’re creating a new design).
You can then use the widget’s many options to fully customize your payment form:
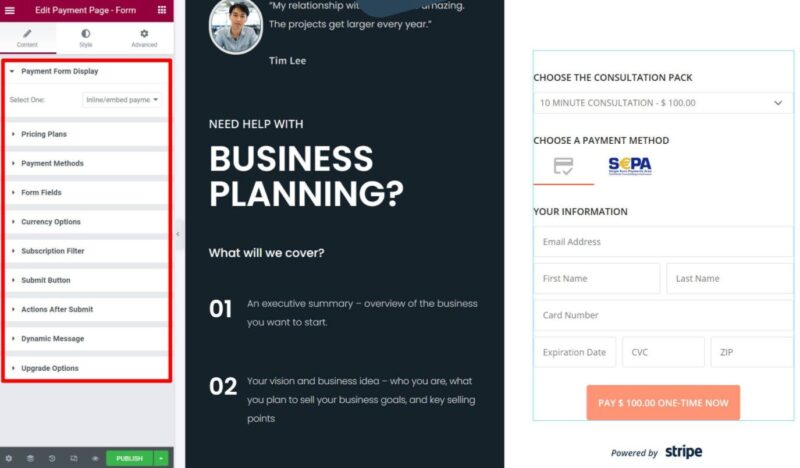
Here are some of the many things that you can customize:
- Choose between using an inline payment form or a popup form.
- Add unlimited payment plans that people can select from. Each plan can have a different price, payment frequency (for recurring payments), and even currency (for multi-currency payment options).
- Enable payment methods on a per-form basis. For example, credit cards, debit cards, Google Pay, Apple Pay, and so on.
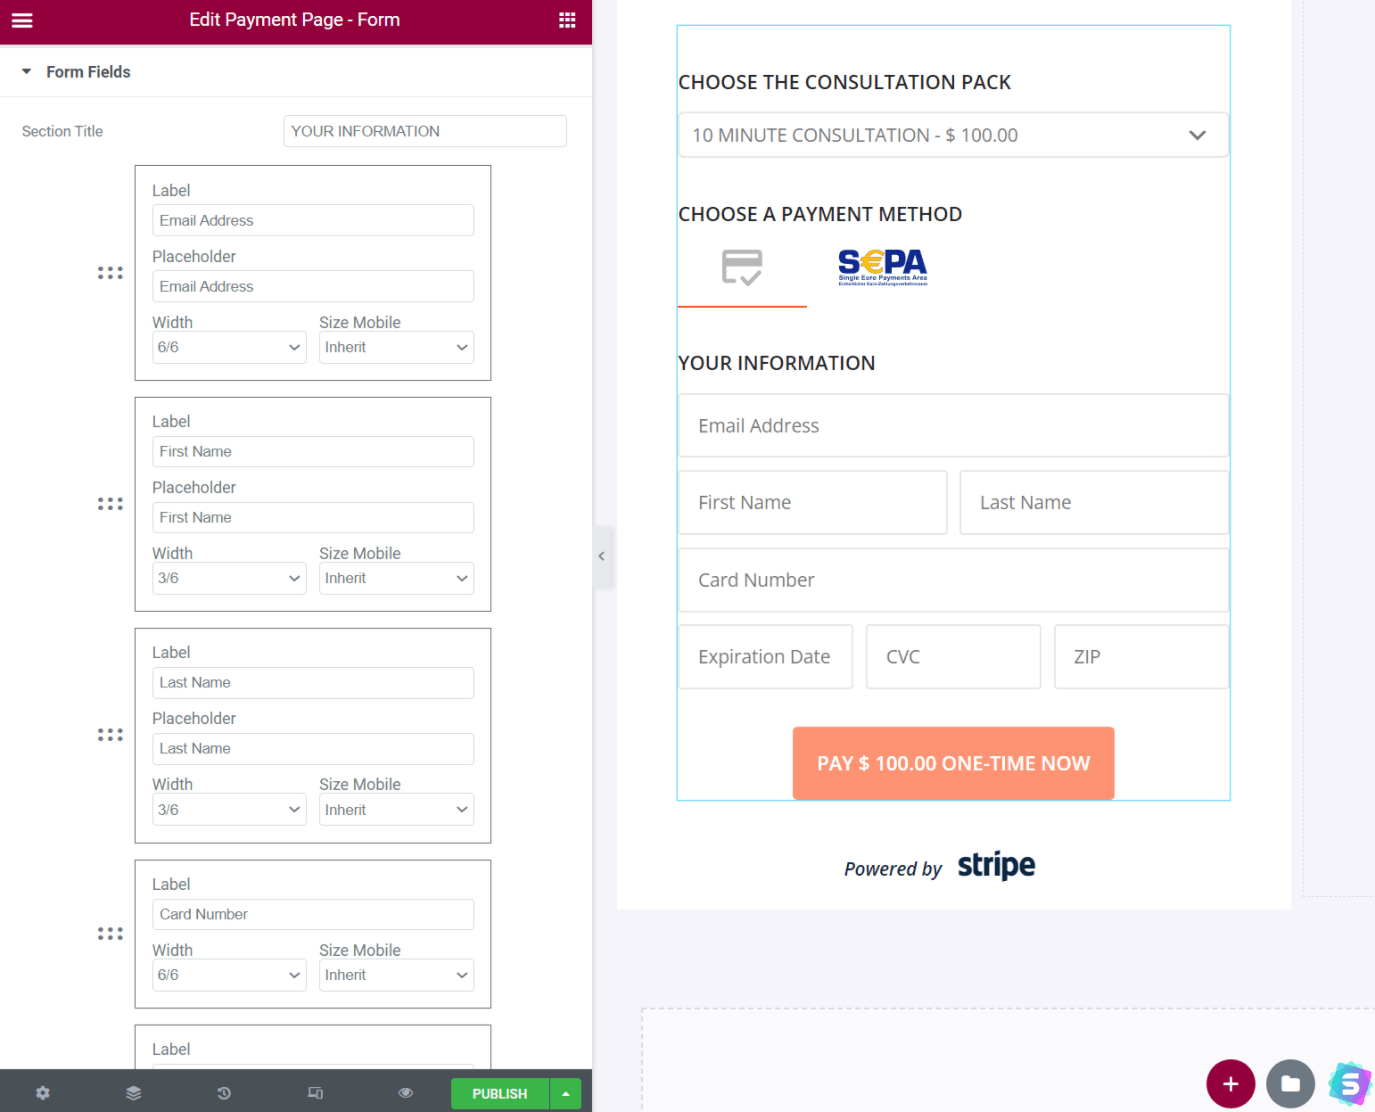
- Choose which form fields to display for collecting non-payment information from customers. For example, their names, email addresses, and so on.
- Adjust currency options, such as whether to let people filter by the currency.
- Add a subscription filter to let people toggle between one-time or recurring payment options.
- Customize the submit button. You can also include dynamic information. For example “Pay [Currency Symbol] [Amount] Now”.
- Choose after submit actions. You can send an email, redirect users to a page, and/or show a dynamic message.
Let’s take a look at two of the most important settings.
First, the Pricing Plans settings let you configure all the different pricing options for your form. For each option, you can choose a custom frequency and currency. You can also choose which fields to show for each option and customize the template for displaying those fields:

Next, the Form Fields settings let you control which form fields to show beyond the required payment fields. You can use this to collect additional information from your customers as needed:
All of the other settings are similarly detailed – this Elementor widget is really the meat of the plugin.
The widget also makes it easy to create multiple payment forms because you can customize all of these settings on a per-form basis.
If you’re creating multiple forms, you might have a situation where you want to include a form on a non-Elementor page. While the plugin doesn’t include a built-in option for this at the time of our review, you could accomplish it by designing a template with Elementor and then embedding the form using Elementor Pro’s Embed Anywhere feature.
5. Customize Your Payment Form Design
Another advantage of the plugin’s Elementor widget approach is that you also get to use Elementor to customize the design of your form. You can do this from the Style tab of the widget, just like any other Elementor widget.
You’ll get options to customize the high-level form, individual form fields, and so on:
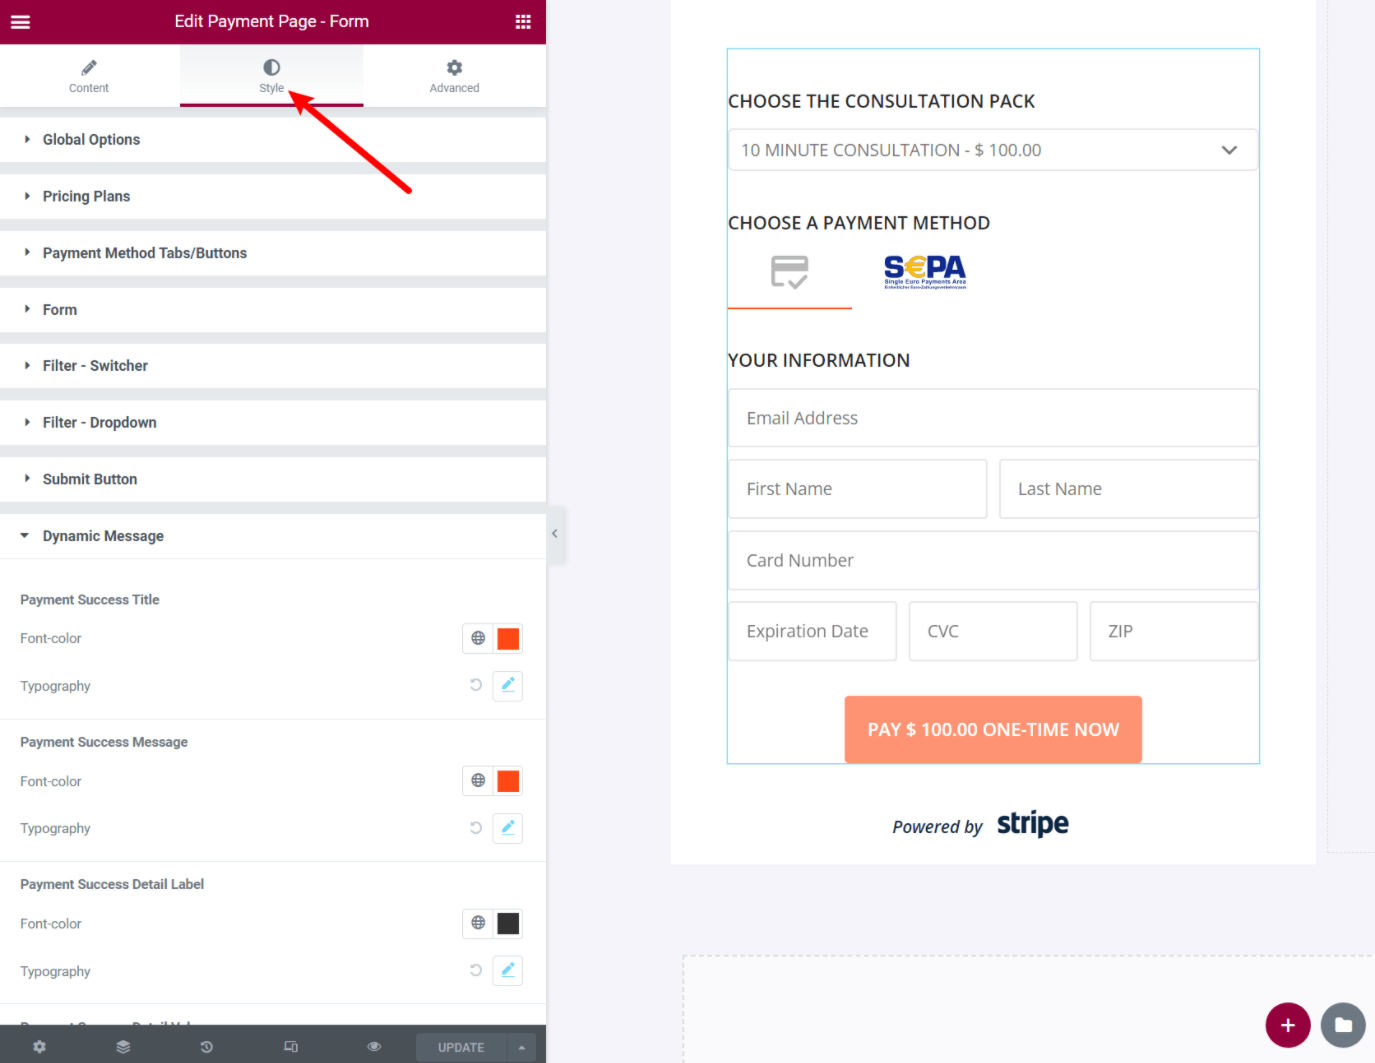
As with other Elementor widgets, you also get responsive controls to adjust how your payment form will look on different devices.
You can also use the options in the Advanced tab to customize spacing and other details, just like any other Elementor widget.
6. Manage Payments
At this point, you’re all done! You can start accepting payments via the form that you created. You can test it out yourself in test mode. Then, when you want to accept real payments, make sure to switch to live mode.
To view and manage individual payments, you’ll use your chosen gateway (Stripe or PayPal). You can also configure the Payment Page to send you a notification email for each payment so that you have another record. You can set this up from the Actions After Submit options in the widget’s settings.
Payment Page Pricing
Payment Page uses a freemium billing model.
That means there’s a free version of the plugin available at WordPress.org along with a premium version for people who need access to more features.
In general, the free version can work if you just need simple one-time payments via credit/debit cards. However, you’ll want the premium version if you need access to the following:
- Recurring subscription plans.
- All extra Stripe and PayPal methods. For example, the free version lets you accept credit/debit card payments via Stripe, but you need the premium version to use options such as Apple Pay, Google Pay, Plaid, and so on.
- Custom payment amounts so that people can enter their own amounts (great for donations/supporters).
- Subscription and currency filters.
- All the Elementor payment page templates – the free version gives you access to three templates, while the paid version unlocks all 11 templates.
There are three licenses for the premium version. All of them give you access to all of the features and one year of support and updates – the only difference is the number of sites upon which you can activate the premium features:
- One site – $99.
- Three sites – $179.
- 25 sites – $599.

The developer is also offering a special 15% discount for WP Mayor readers that makes those prices cheaper:
All plans also come with a 30-day money-back guarantee, so there’s no risk to your purchase.
Final Thoughts on Payment Page
Overall, Payment Page makes it very easy to quickly get up and running with a good-looking payment page.
If you like Elementor, being able to configure everything without leaving the Elementor interface is very convenient. You can import a template, customize the payment form functionality and design from Elementor, and have a working payment page in just a few minutes.
One thing to remember is that, at least currently, the plugin relies on Elementor. So if you don’t want to use Elementor, that would be something to consider. It would be great to see the plugin add similar support for the native WordPress editor so that you could also customize a payment form using a block.
Overall, though, if you’re using Elementor (or open to using Elementor), Payment Page makes it very easy to start accepting payments using flexible, stylish forms.
If you want to try it out, you can install the free version from WordPress.org. Then, consider upgrading to the premium version to access recurring payments, more payment gateways, and other useful features.
0 comments:
Post a Comment