Want to create a WooCommerce list view to display your products instead of the default WooCommerce shop page?
Offering a product list view can be a more user-friendly way to let your customers browse your offerings.
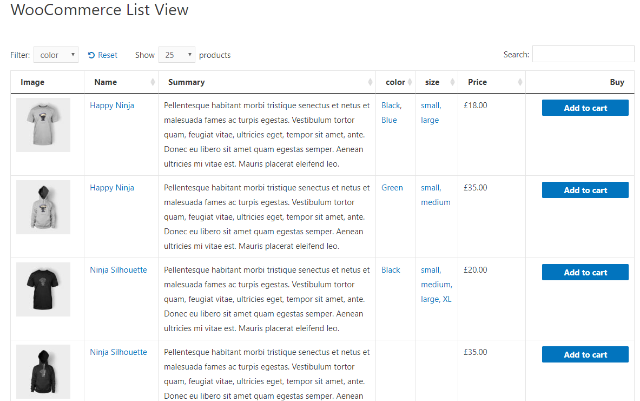
A list view takes up a lot less space, while simultaneously letting customers see more information about each product’s nitty-gritty details:

It’s not the best approach for every single WooCommerce store. But if your store sells certain types of products (more on these in a second), it can be a great way to make your store more usable and maybe even boost your conversion rate.
In this post, I’ll first talk about which types of stores can benefit from a list view. Then, I’ll show you how the WooCommerce Product Table plugin can help you generate a simple WooCommerce list view shortcode for your store.
Using this shortcode, you’ll be able to control exactly which products display and optionally add elements like a search box, filtering/sorting, and more. You can even let people add products to their cart directly from the list view.
Which Types of WooCommerce Stores Can Benefit From a List View?
In a nutshell, using a WooCommerce list view is a great option if you’re selling products where the most important thing is information (like product specs). On the other hand, the traditional WooCommerce shop page is better if people will mostly buy your products based on pictures and/or reviews.
For example:
- Designer clothing? That’s probably better off with the traditional shop page because people will buy mainly based on how your clothes look.
- Wholesale blank t-shirts? That’s probably better off with a list view because people are going to be more concerned with the nitty-gritty details.
- Expensive headphones? That’s probably better off with a traditional shop page so that people can read reviews and a detailed product description.
- Audio cables for headphones? That’s probably better off with a list view so that people can quickly compare things like length, diameter, material, etc.
On a broader level, a WooCommerce list view works great for these types of stores:
- Wholesale stores – like the t-shirt example above, most wholesale shoppers will probably care more about details than lots of pictures.
- Parts – if you sell individual parts, a list view can help people quickly find the exact part they need.
- Books, CDs, etc. – again, these are the types of things where the pictures aren’t especially important.
- Online food ordering – it’s pretty easy to set up online restaurant ordering with a WooCommerce list view.
How To Create A WooCommerce List View Table
Now that you have a better understanding whether or not your specific store can benefit from a product list view, let’s get more into the how-to part so that you know how you can actually go about creating a list view at your store.
To build your list view, you’ll use the WooCommerce Product Table plugin from Barn2 Media.
This plugin lets you create a table from either all or some of your WooCommerce products. For example, you could list:
- Every single product
- One or more categories of products
- One or more product tags
- Products by custom field value
- Individual products (by post ID)
And you can also create multiple list views if you want to display different products in different locations.
As for how your list view looks, you can choose exactly what information displays in this table (including custom fields), as well as functionality like:
- Add to cart buttons
- AJAX search (or traditional search with a page reload)
- Sort/filter
- Pagination
- Lazy loading
To follow this tutorial, all you’ll need is the WooCommerce Product Table plugin installed and activated at your WooCommerce store.
Once you have that, here are the steps to take to get your WooCommerce list view shortcode all set up.
Step 1: Set Up Style For Your List View
While WooCommerce Product Table always lets you customize things via its many included shortcode attributes, the easiest way to get started with the plugin is to configure the default shortcode settings using the human-friendly interface.
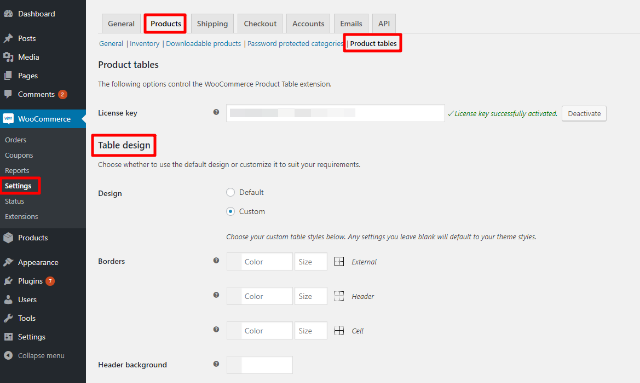
To access this interface, go to WooCommerce → Settings → Products → Product tables.
At the top, you can configure the basic style for your list view:
- Default – the plugin will do its best to pull from your theme’s styles.
- Custom – lets you manually enter the styles yourself.

Step 2: Add Column Controls To Choose What Information Displays
Once you’ve chosen how you want your list view to look aesthetically, you should choose the actual columns that you want to display in your list view.
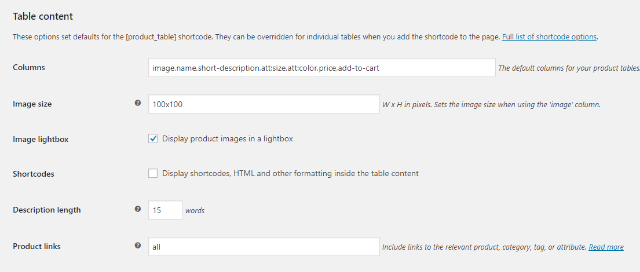
WooCommerce Product Table lets you display any standard WooCommerce fields (e.g. name, price, description, etc.), as well as any product attributes or custom fields that you may have added.
You can view a full list of potential columns here.
In the screenshot below, you can see how I configured things to generate the example product list view at the beginning of this post:

You can also configure some other basic functionality like image sizes, description length, etc.
Step 3: Consider Add To Cart, Search, Sort, Filter, etc.
Next, you’ll want to finish out by configuring all the smaller nitty-gritty details below:
- Loading products – lets you choose how many products to display per page, as well as whether or not to cache table contents or lazy load products (good for page load times). Be aware that lazy loading will affect your AJAX sort, search, and filtering, though.
- Sorting – choose how to order products by default.
- Add to cart column – choose how the add to cart button should work.
- Table controls – enable filtering, searching, and control pagination options.

Step 4: Generate WooCommerce List View Shortcode
Once you’ve configured all the default options, all that’s left to do is generate your WooCommerce list view shortcode.
If you want to display every single product at your store, you can just place the base shortcode wherever you want your list view to appear:
[product_table]
If, however, you only want to display certain products, you’ll want to add an additional parameter:
- category – lists products from a specific category (by slug)
- tag – lists products from a specific tag (by slug)
- term – lists products from a specific custom taxonomy
- cf – lists products with a specific custom field value
- include or exclude – either includes or excludes individual products by their post IDs
- exclude_category – lets you exclude a specific category.
There are also other options that let you include products with a certain status or publish date. You can read all the options here.
For example, to display only products from the clothing category, you’d use this shortcode:
[product_table category='clothing']
Where ‘clothing’ is the category’s slug.
And just like that, you should see your WooCommerce product list view wherever you placed the shortcode:

Create A WooCommerce Product List View Table Today
If you need to display products where nitty-gritty information is more important than things like pictures or reviews, creating a list view of your products offers a more user-friendly way for your customers to browse, search, and filter your product catalog.
To actually create your list view, WooCommerce Product Table makes it easy to not only list products, but also:
- Choose exactly which products to display in your list.
- Control exactly what information you display about those products.
- Let your shoppers search and filter your list, without requiring a page reload.
To get started, head here to purchase WooCommerce Product Table.
Have you successfully used a product list view at your WooCommerce store? Share your thoughts on this approach in the comments!

Expresstech Softwares Solutions is a leading Woocommerce Development Company, having certified developers committed to building successful eCommerce stores for their Clients. +91-9806724185 or Contact@expresstechsoftwares.com
ReplyDelete