
Depending on what you’re selling at your WooCommerce store, the typical shop page might not be the best way to present your products. Instead, a WooCommerce order form can sometimes be a more efficient way to showcase your wares, especially when you need a more compact layout to display more products in the same space.
You can either completely replace your shop page with one or more order forms. Or, you can add a more compact order form in addition to your regular shop page.
Depending on what type of products you sell, this can be a great way to make it easier for your visitors to shop your full selection and, subsequently, boost your conversion rate.
In this post, I’ll tell you what I actually mean by “WooCommerce order form”. Then, I’ll show you how to create one!
The Difference Between The Regular Shop Page And An Order Form
To set the stage for what I’m going to teach you how to build, here’s an example of the difference between a WooCommerce order form and a regular shop page.
A standard shop page looks something like this:

There’s a big focus on imagery. And if a shopper wants more detail, or to select things like different variants, they usually have to click into the actual product page.
There’s nothing wrong with this method – it’s popular for a reason. It’s just not the best method for every single store.
A WooCommerce order form, on the other hand, allows shoppers to see a lot more products at the same time, while also being able to configure sizes and variants without visiting another page:

This method of displaying products can be a lot more conversion friendly for stores that:
- Sell products where the emphasis isn’t on imagery, but more on technical details (for example, you can create a column just for technical specs so that people can easily compare products).
- Offer a “build your own product” solution where customers can choose multiple options at once to create their own bundle.
- Sell a huge number of products.
- Offer bulk orders, where customers don’t really need to look at detailed product pages for each item.
You can also use both effectively at the same time. For example, you could use a WooCommerce order form to let people easily order a bundle of individual products (that you display individually on your regular shop page).
So, whether you want a standalone WooCommerce order form, or just want to add this functionality to an otherwise normal store, here’s how to create your own order form.
What You Need To Create A WooCommerce Order Form
To create your form, you need a plugin that can:
- Display products in a table format
- Let you include WooCommerce elements like Add to Cart buttons, variant selector drop-downs, and more.
WooCommerce Product Table offers all the necessary functionality, which is why I’ll use it for this tutorial.
Basically, the plugin gives you a customizable shortcode that you can use to display your order form anywhere on your site. With this shortcode, you can control:
- Exactly what information to display
- Which products to include
- Whether to let shoppers search/filter the list or not
Your shoppers will then be able to select variants and add one or more products to their carts right from the form.
Once you have the plugin installed and activated, here’s how you can use it to create an order form for your WooCommerce store.
Step 1: Configure WooCommerce Product Table Shortcode Defaults
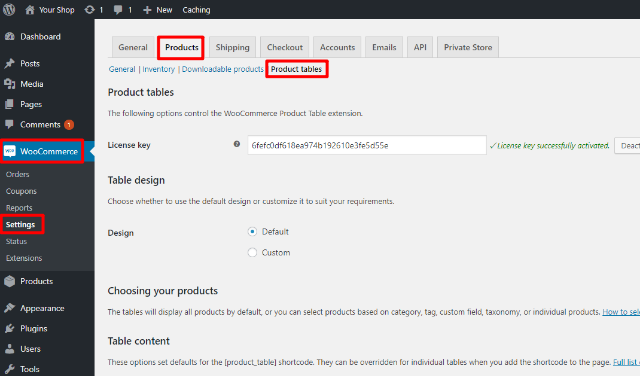
To get started, head to WooCommerce → Settings → Products → Product Tables to configure the plugin’s default settings.
These settings apply to the default [product_table] shortcode.
You’ll always be able to modify these settings on an individual basis with shortcode parameters. But setting up the defaults will save you time going forward.
There are a lot of small settings here, so I’m just going to highlight the most important settings for you to create your form.
With that being said, I do recommend that you peruse all the smaller settings as well, as you might find something relevant to your specific needs.
Here are the most important settings to configure:
- Columns – this lets you configure what information to display on your form. For example, you’ll probably want columns for the product’s image, name, price, and an add to cart button. You might also want to display variant drop-down selectors or a separate column for product dimensions.

- Add to cart column – this lets you configure how your add to cart button functions. You can either display a button or a checkbox (or both). You can also choose whether to use the nice AJAX add to cart functionality, as well as some other relevant settings.

- Table controls – this section lets you configure what filtering/search options are available to customers, as well as some other smaller settings. If you have tons of products, you’ll probably want to enable some filter functionality. But if you just have a few products, it’s usually best to turn them off.

For more in-depth instructions, check out our post on how to create a regular WooCommerce product table.
Step 2: (Optional) Use Shortcode Parameter To Control Which Products Display
At this point, you’ve configured the basic styling/functionality for your table. But you still need to tell the table which products to display on your WooCommerce order form.
To do that, you can use a few different shortcode parameters:
- Category – displays all products from the selected category (or categories)
- Tag – displays all products from the selected tag(s)
- Term – displays all products from the selected custom taxonomy term(s)
- Cf – displays all products with a specific custom field value
You can also use the include and exclude parameters to target specific products by their product ID.
For example, to target all products from the posters category, you could set it up like this:
[product_table category="posters"]
Or, you can always just use the basic shortcode if you want to display all products.
Step 3: Place Shortcode Where You Want It To Appear
Now, all you need to do is add that shortcode where you want your order form to appear and, depending on how you configured the default settings, you should see your order form:
If you want to customize this specific order form to be different from the defaults that you set, you can use the plugin’s many shortcode parameters.
Make It Easier For Your Visitors To Shop
In the end, using a WooCommerce order form can make it a lot easier for your visitors to shop at certain types of stores.
When you make it easier for visitors to shop, you make it easier for them to give you their money. And that’s a good thing for your store’s conversion rate and bottom line!
So – think about how your shoppers should best experience your store. Then, consider using a WooCommerce order form to make it easier for them to browse your product catalog.
And for more cool uses of this plugin, check out our article on how to create a table of affiliate products with WooCommerce.
There are a lot of small settings here, so I’m just going to highlight the most important settings for you to create your form.LG C7P
ReplyDelete